
How to create a Scene Navigation tool with Odin
TL;DR - you can find the full tool implementation on my gist page.
Scenes. Most of us are not using enough of them. One day I might write a whole post about why multiple scenes help development in scale by reducing the amount of changes to the .Unity files, and allowing another layer of modularity on top of Prefabs. There’s nothing worse than having Unity crash mid-work and our changes gone. Or to merge a scene from our source control and losing important changes. Anyone that have overwritten a co-workers change and now has to restore it from the asset’s YAML will know the agony of which I’m talking about…
But in order to use multiple scenes, and navigate through them with ease, one needs tools better than the built-in search. Even Quicksearch, one of my must-haves, is not enough. I want to jump between scenes quickly, This turns imperative when you have a scene you are working on, and a ‘GameLoad’ scene (or any kind of entry point on play mode).
“So let’s make our own tool”, the optimistic developer must think to themselves. But then they need something from the oh-so-dreaded UnityEditor namespace. And it is rightly dreaded. Through experience you might achieve proficiency with it, but I challenge you to return to that code after a few months and still remember what the heck is going on in there. It is poorly documented, and non intuitive. So a better solution must be found.
For the last two years I’ve been using Odin Inspector to smoothen my tool-creation workflow, and in some projects - to serialize otherwise non-serializable data structures. Like Dictionaries. Gotta love dictionaries.
This time though, we are going to create a basic menu we can open with a keyboard shortcut, Let’s begin!
from this point on, I assume you already know how to basically install and configure Odin. There are guides out there, mainly the official ones. If you want me to write one too, simply comment below.
SceneId.cs
Before we get into the actually tool itself, I would assume you have some sort of SceneId enumeration for your scenes, and that you are not just referring scenes by their numbers when loading them with the SceneManagement namespace. Come on, that’s a rookie move.
Why you should make one?
- For starters, using the enum name in your code increases readability
- You can present the string in Logs, and more relevant to our case - in tools.
Here is the basic SceneId file from my project:
1
2
3
4
5
6
7
8
namespace Game.Core.Scripts.GameTypes
{
	public enum SceneId
	{
		MainMenu = 0,
		Run = 1
	}
}
You can make one of your own. I might expand one day on my own Scene Management tool, but this is the base of it.
SceneNavigationEditorWindow.cs
This is the only file we’ll need. I would recommend creating a seperate folder and an Assembly Definition for any Editor tool so it won’t require recompilation while building the rest of your game, and other benefits. But again, this is a topic for another project structure post later on.
This is my vision for the final look of the tool (for now):
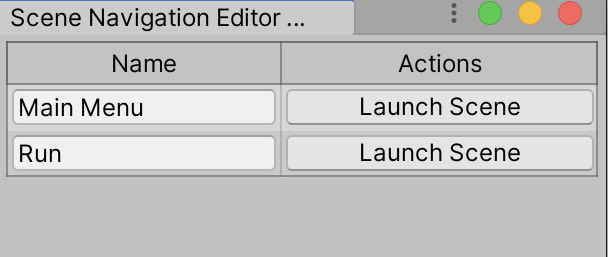
So conceptually we want to iterate each scene from our SceneId enum, and create a button to launch the relevant scene. Simple enough.
Our class is going to inherit from the class OdinEditorWindow, which gives us access to some callbacks, and some attributes that will be considered by the Unity Editor. This simple menu is actually not using any of the Odin features, but as we expand this tool and others in the next entries of this series you could feel the wrath of the all-father.
Ahem. Let’s also use the attribute which will make the editor consider this class as a menu item. It’s called - surprisingly, MenuItem. The attribute can receive the name of the menu item as a parameter, as well as a hidden-and-not-well-documented keyboard shortcut.
1
2
3
4
5
6
7
8
public class SceneNavigationEditorWindow : OdinEditorWindow
{
	[MenuItem("Tools/Scene Navigation %g")]
	private static void OpenWindow()
	{
		GetWindow<SceneNavigationEditorWindow>().Show();
	}
}
Go back to Unity and press CMD/CTRL + G. AMAZING! You now have an empty window. And what shall we do with all that space….
Let’s get back to the original idea. We want to create a class that will represent an openable scene which has a name, and more importantly - an asset which we can open.
GameSceneActions
Let’s begin. This part is straightforward.
1
2
3
4
5
6
7
8
9
10
11
12
13
14
15
16
17
18
public class GameSceneActions
{
	private SceneId _sceneId;
	public readonly string Name;

	private string _assetPath = null;

	public GameSceneActions(SceneId sceneId)
	{
		_sceneId = sceneId;
		var sceneIdString = _sceneId.ToString();
		Name = string.Concat(sceneId.ToString()
				.Select(character => char.IsUpper(character) ? " " + character : character.ToString()))
			.TrimStart(' ');

		LocateSceneAsset(sceneIdString);
	}
}
You regex-fu might prove useful in making that last part shorter. I’m rusty, so I’m leaving it like this for readability.
Now we need to implement LocateSceneAsset. We’ll use some more editor scripting here and query the AssetDatabase in a way very similar to what happens when you search the Project window in the editor. When you enter ‘t:scene’, the database searches for a scene file!
Note that the AssetDatabase.FindAssets method returns GUIDs - the unique Ids Unity creates for each file under the Assets directory (this is what Unity save in those mysterious .meta files). This is unfortunate, since when we wish to actually load a scene later on with the EditorSceneManager class, we’ll need the file Path, not the GUID. So we’ll query the path using AssetDatabase.GUIDToAssetPath.
Since we are getting the full path (including all of the parent directories), the last part of the method is distilling the scene name from the full path. This is where our SceneId come in handy - we’ll make sure the scene id name matches the asset, and vice-versa. You might tailor this to you liking, but I like to be precise. I am also making sure these are actually .unity files, and yes, some regex-fu will make this a bit more flexible and performant (but less readable, in my humble opinion).
Here is the full method:
1
2
3
4
5
6
7
8
9
10
11
12
13
14
15
16
17
18
19
20
21
22
23
24
25
26
27
28
29
30
31
32
33
34
35
36
37
private void LocateSceneAsset(string sceneIdString)
{
	var assetsPaths = AssetDatabase.FindAssets($"t:scene {sceneIdString}");
	if (assetsPaths.Length == 0)
	{
		Debug.Log($"No Scene Assets Found by SceneNavigationEditorWindow for {sceneIdString}");
		return;
	}

	foreach (var guid in assetsPaths) //for cases in which several scene of the same name exists
	{
		var path = AssetDatabase.GUIDToAssetPath(guid);
		var pathParts = path.Split('/');

		if (path.Contains(".unity"))
		{
			var assetName = pathParts.Last().Replace(".unity", "");
			if (String.Equals(assetName, sceneIdString, StringComparison.CurrentCultureIgnoreCase))
			{
				_assetPath = path;
				break;
			}

			if (assetName.Contains(sceneIdString))
			{
				_assetPath = path;
				break;
			}

			if (sceneIdString.Contains(assetName))
			{
				_assetPath = path;
				break;
			}
		}
	}
}
The last method we need to add to GameSceneActions is the ability to actually load the scene. As I detailed before, this will use EditorSceneManager, which controls the editor. I’ve also added a call to save the scene changes before transitioning. This is a bit backwards (like most of the UnityEditor namespace TBH) but we’ll actually press the Save and Save Project menu items from code with EditorApplication. Wicked.
1
2
3
4
5
6
7
8
9
10
11
12
13
14
15
16
17
18
[Button("Launch Scene")]
public void OpenScene()
{
	if (_assetPath != null)
	{
		EditorApplication.ExecuteMenuItem("File/Save");
		EditorApplication.ExecuteMenuItem("File/Save Project");

		if (Event.current != null && Event.current.alt)
		{
			EditorSceneManager.OpenScene(_assetPath, OpenSceneMode.Additive);
		}
		else
		{
			EditorSceneManager.OpenScene(_assetPath);
		}
	}
}
Wait wait, what is Button ?? This is the true power of Odin right here… The ability to make every method in your serializable classes a button you can press in the editor. Super helpful for testing, and prevents you from creating custom renderers for you components. All with a simple attribute.
You’ll also notice I’ve added the ability to open a scene in an additive manner if the Alt key is pressed when clicking the button - meaning it will be added to the already open scene, if it’s not already open. Useful for multi-scene setups.
Wiring it all together
Now let’s query for all of the openable scenes once we launch the menu, and display them in the window. Replace your SceneNavigationEditorWindow code with this:
1
2
3
4
5
6
7
8
9
10
11
12
13
14
15
16
17
18
19
20
21
22
23
public class SceneNavigationEditorWindow : OdinEditorWindow
{
	[MenuItem("Tools/Scene Navigation %g")]
	private static void OpenWindow()
	{
		GetWindow<SceneNavigationEditorWindow>().GameScenes = InitializeGameScenes();
		GetWindow<SceneNavigationEditorWindow>().Show();
	}

	[TableList(AlwaysExpanded = true, IsReadOnly = true, HideToolbar = true)]
	public List<GameSceneActions> GameScenes;

	private static List<GameSceneActions> InitializeGameScenes()
	{
		var gameScenes = new List<GameSceneActions>();
		foreach (var sceneId in Enum.GetValues(typeof(SceneId)))
		{
			var sceneActions = new GameSceneActions((SceneId) sceneId);
			gameScenes.Add(sceneActions);
		}
		return gameScenes;
	}
}
Nothing fancy here code-wise, just added a static class to enumerate the SceneIds and create the values.
The thing to note is the TableList attribute. This will display any enumerable as a list, and it has many parameters to control the paging (in cases of long lists) etc… For now, we’’ use it to create a clean look.
And.. that’s it, really! If you’ve followed along you’ll have a working navigation tool! Hurrah! In case you’ve switched things around, you can find the full code in this gist file. Congrats! Here’s to Odin, you new one-eyed best friend.
Additional Ideas
This tool can be expanded on in many ways - For example, to open scene presets, to display information on the scenes, and I’m sure you can find more. I certainly will add more information here later on, as I create more tools for my super-secret project on which… I will not expand now. But if 2021 goes in the right direction, it will not be long before I write about it. Cheers!